Rocket Project
By: Ethan Sullivan
Rocket Reflection- Green Day
My rocket exhibition was awesome! If I could go back and change my rocket I would have called it apettite for destruction and painted it black. Also, In red letters spray paint Gun's and Roses. Also, maybe just put a sweet nose cone on it. Also, I should have done a sweet launch like a backwards roll. If I could have stayed around for our third launch at the exhibition I would have cranked up the psi to like 200 and just watch it blow up. Overall, I loved my rocket, but would have
made those little changes to it and changed the way I launched the rocket at the exhibition.
The advice I would give next builders would be to use 3 pressure chambers because it worked really effectively for us. I would tell them if you do that it will fly literally 800 feet into the air, but I would say don't paint it green because that was our idea. Also, our rocket was really successful because we had a really light mass. The lighter the mass the higher your rocket will go. That is the advice I would give next year's builder's and hope they have a great rocket project.
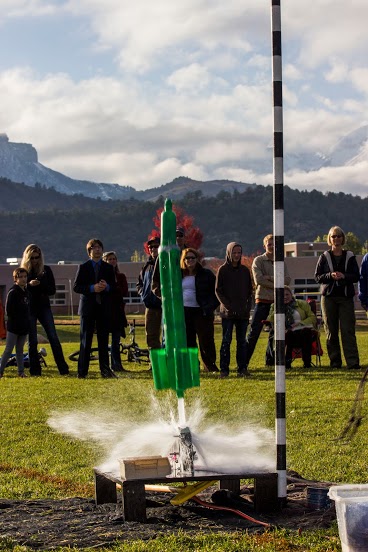
Our Rocket on exhibition
Data; Rocket Specs and flight information
Conclusion
Exhibition day went really smooth. Tristan did a backwards roll at exhibtion! The observers were about 53 meters away. The angle to our rocket was 66 degrees. The maximum height for our rocket at exhibition was 118 meters. Tristan and I's theoretical flight time was 6s and we were not sure what our actual hang time data was. Tristan and I's percent error was 13%. To get the percent error we took the approximate value and multiplied it by the exact value and then divided by the exact value and then multiplied by 100. 13% error is very low. It is low because of the way our rocket was designed and the amount of fins we put on it. Overall, I loved this project and I am sure Tristan did too and I feel like I have a much better understanding behind the physics of this project.
Rocket Log
Day 1: Sketched out designs.
Day 2: Brought in materials and started crafting out our rocket.
Day 3: Started to glue two liter bottles together.
Day 4: Started crafting out a nose cone.
Day 5: Got the nose cone on and spray painted it black.
Day 6: We named it back in black.
Day 7: We finally did a test launch and the back in black died.
Day 8: Back to the drawing board.
Day 9: The new rocket we decided is green day and the design would be two big smart water bottles with three small tubes on the side.
Day 10: We had a down day and went into the weekend with a good design!
Day 11: Came back and had a solid design and we then did a test launch and it was beautiful it went 800 feet into the air and had a perfect parachute deployment!
Day 12: This day we spray painted it green.
Day 13: We then put tons of designs on it.
Day 14: Edited our parachute got it to where it was going to work and were ready for exhibition!
Rube Goldberg Project
The Rube Goldberg project was the best project for me this year. A rube Goldberg is a contraption or a machine of something trying to complete a simple task. My simple task was to hit a drum with a drumstick. The requirements for the project was to make your rube have 15 steps, last for 15 seconds, and have 3 simple machines. For our rube we had only 10 steps, but it worked 3 out of 3 times when he did checks on the project so that was a fulfilling feeling knowing we did good. Exhibition went really well because our rube worked awesome and people were very impressed by it. We also had exhibition at the Durango Discovery Museum, and there were inside Durango TV people there filming the Rubes, so this really felt like a community exhibition where we could show off work.
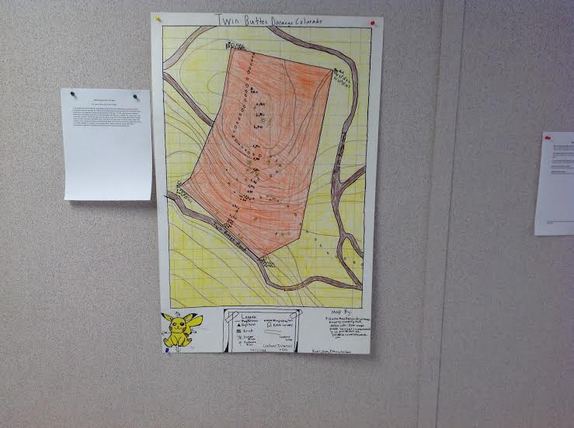
- Methodology Behind the Map
By: Jake, Ethan, Kodii, Tristan
This project was about making a topographic map of the Twin Buttes area using a compass and gps to draw out our map.† We measured bearings and paces by going out in the forest in twin buttes with a compass and measuring the direction that way. For the bearings we measured them before we walked towards our next destination the rock. We also, needed Google earth to help us draw our contour lines and without google earth it would have been extremely hard to plot the lines and make it look the way it does now. Contour lines represent elevation and where the land is flat and where it is steep. this project really made me and my group learn about topographic maps and I definitely have a better understanding of what they are.
